Authoring a Logical Entity
This post is related to the second modding tutorial you can find [here].
This is a very important tutorial as it's a real introduction to Mod programming in Valve's Source, and if you understand it you will be able to do more complex stuff.
Exploring this tutorial is not clear what is it purpose or how can you test it. That's the purpose of this post, make it clearer. Please note, there's not a single example of how can you use the entity or where it can be useful. I will help on that.
Go through the tutorial and, when you have completed the Build process, go back to this post. I will just mention a couple of things may help you with this process.
1. Although there's no mention about that, it's good if you start with the mod you just created in previous tutorial.
2. the sdk_logicalentity file name can be any other, what really matters is the following line:
LINK_ENTITY_TO_CLASS( my_logical_entity, CMyLogicalEntity );
Where you link the class you are creating to "my_logical_entity" label in the FGD file. This name is what you will see in Hammer
Once code is built, you can start the process of adding the logical entity to your map. Create the FGD as suggested in tutorial, and let's proceed with the map.
Now, open the Source SDK and double click the Hammer editor (Where you create the Levels). Before opening Hammer, make sure that under "Current Game", you have to select the Mod you have modified.

Now, you have to setup Hammer so you can use the logical entity by linking the FGD (with the entity description) to Hammer. Follow tutorial Instructions but, take a look at my screenshot. In Configuration, make sure you selected your Mod and, in Game Data Files, click on Add to add your FGD file. That's all. You are now ready to create your Level.

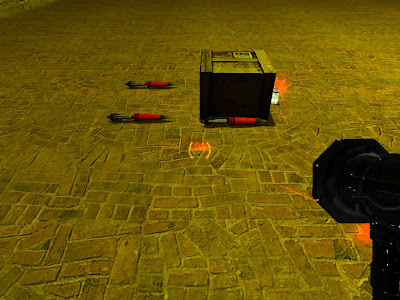
I won't give details on how to create a map, but it's prety straightforward if you have used a 3D package before. You can follow the Your First Map tutorial to create it. I just made a squared room where the action will take place.

As you can see in the screenshot, I added three rpg rounds (item_rpg_round) a crate (item_item_crate) and an npc grenade (npc_grenade_frag). Also, a player (Dr. Freeman) has been added so the game is ready. Now, run map to create the BSP file. I check "Don't run the game after compiling" so you don't have to start the Mod for every change you do. Instead, run your Mod from Steam and load map by typing "map [your map name]". If you make any change in your map, compile it and reload it in your Mod without restarting the application.
Note. Do not forget to name every object in your map (well, at least the most relevant) so you can link them later in events.
Now the logical entity starts to work. Let me think of a counter usage (no clues in tutorial) ... hmm it can be use for example to count flags you capture. Another usage ... as a trap; in our example we will use the counter to setup a trap for a player hungry for Ammo. If the user takes more than two Rpg rounds, the hidden grenade will blow punishing player. Got it?
Add my_logical_entity to the map and, place it anywhere (Mine is the red square on screen). Double click for properties. In threshold keyvalue enter 3. That is, the output is launched when count equals 3.
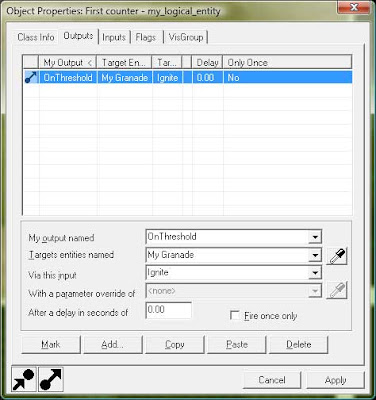
Go to outputs and add a new Output. Take a look at the following screenshot. Please note that, when the event "OnThreshold" is triggered, The entity "My Grenade" will call it's action "Ignite", that is ... blow!!
Now, there's only one thing left ... How to increment the counter? Take each Rpg Round and add an output: In the event that user touches the Round (OnPlayerTouch), tell the target (First Counter, this is the name of my logical Entity) to "Tick", that is, increment the counter. Do this for every round.
Now, when user picks up all three rounds, the logical entity counter will increment to 3 and the grenade will ignite.
This is how it looks when playing.
That's all. I hope you enjoy creating some other Logical Entities. Let me know what came to your mind.

Now, there's only one thing left ... How to increment the counter? Take each Rpg Round and add an output: In the event that user touches the Round (OnPlayerTouch), tell the target (First Counter, this is the name of my logical Entity) to "Tick", that is, increment the counter. Do this for every round.
Now, when user picks up all three rounds, the logical entity counter will increment to 3 and the grenade will ignite.
This is how it looks when playing.

That's all. I hope you enjoy creating some other Logical Entities. Let me know what came to your mind.
Comments
What does that mean? When I start up Visual C++ and start a new project there is no mention of a Server project.